
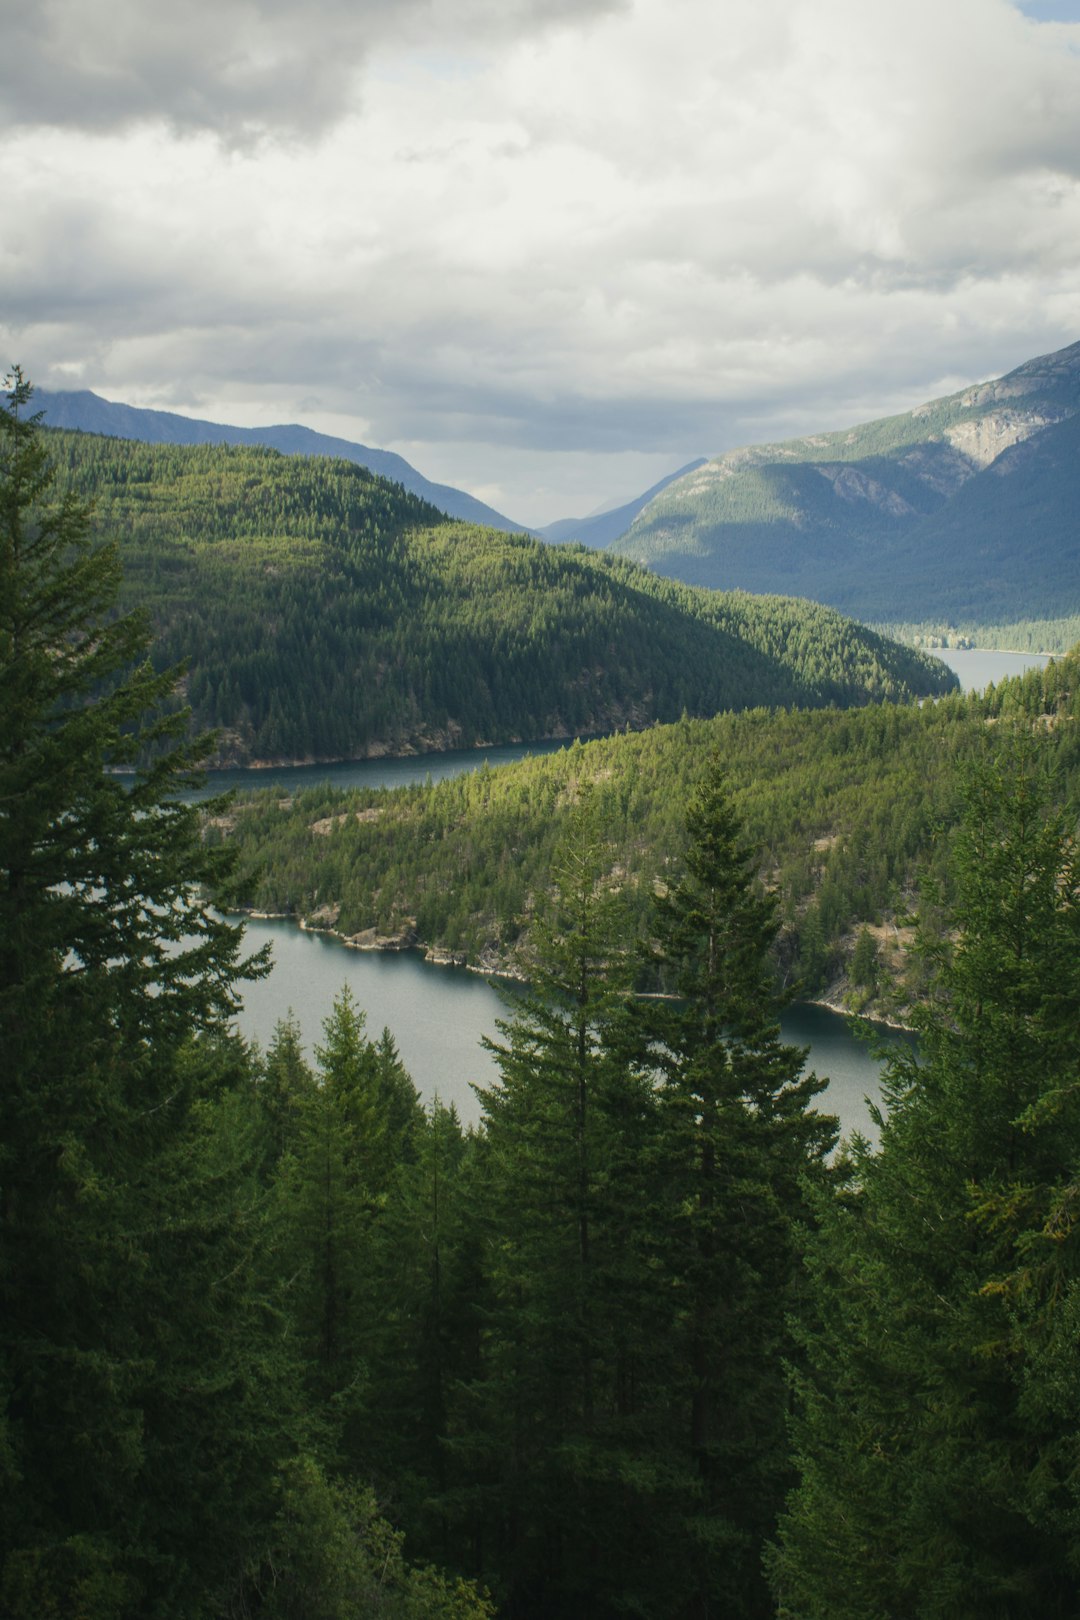
Landscape photography is one of the most rewarding genres in photography, offering the opportunity to connect with nature while creating compelling images that inspire viewers. Whether you're photographing vast mountain ranges, intimate woodland scenes, or dramatic coastlines, certain techniques and approaches will help you capture the beauty of the natural world. In this guide, we'll explore the essential elements of landscape photography that will elevate your images from simple snapshots to breathtaking landscapes.
Essential Equipment for Landscape Photography
While you can certainly begin landscape photography with just a smartphone or basic camera, certain equipment will help you maximize your results:
Camera
Any camera with manual controls will work for landscape photography, but cameras with larger sensors (full-frame or APS-C) generally offer better dynamic range, which is particularly helpful for capturing scenes with bright skies and darker foregrounds. Weather sealing is also beneficial for protection in outdoor environments.
Lenses
A versatile kit for landscape photography typically includes:
- Wide-angle lens (16-35mm full-frame equivalent) for capturing expansive scenes and emphasizing foreground elements
- Standard zoom (24-70mm) for versatility in various landscape compositions
- Telephoto lens (70-200mm or longer) for compressing distant elements and isolating specific features in the landscape
Tripod
A sturdy tripod is essential for landscape photography. It allows you to:
- Use slower shutter speeds for capturing movement (like flowing water or clouds)
- Shoot in low light conditions without raising ISO
- Create precisely composed images
- Capture multiple exposures for HDR blending or focus stacking
Invest in a tripod that's robust enough for windy conditions yet portable enough for hiking. Carbon fiber models offer an excellent balance of stability and weight.
Filters
Several filters are particularly useful for landscape photography:
- Polarizing filter for reducing reflections and enhancing colors, particularly useful for foliage and water scenes
- Graduated Neutral Density (GND) filters to balance exposure between bright skies and darker foregrounds
- Neutral Density (ND) filters for long exposures that create smooth water and cloud movement effects
Pro Tip: Filter Systems
Consider investing in a square filter system (like Lee or NiSi) rather than screw-on filters. These systems allow you to use the same filters across different lens sizes and precisely position graduated filters.
Additional Accessories
- Remote shutter release to minimize camera shake during long exposures
- Extra batteries, as cold weather and long exposures can drain batteries quickly
- Weather protection for your gear
- Lens cleaning kit to handle dust, water droplets, and fingerprints
- Headlamp for navigating in pre-dawn or post-sunset conditions
Mastering Composition in Landscape Photography
Composition is arguably the most important aspect of landscape photography. Even with perfect technical execution, a poorly composed landscape won't engage viewers. Here are some key compositional techniques:
Foreground Interest
Including compelling foreground elements creates depth and invites viewers into your image. Look for interesting rocks, flowers, patterns in sand or ice, or other elements that complement your main subject. Wide-angle lenses can emphasize foreground elements by creating an exaggerated sense of perspective.
The Rule of Thirds
Dividing your frame into a grid of nine equal parts and placing key elements along these lines or at their intersections creates a balanced, dynamic composition. This is particularly effective for horizon placement—typically placing the horizon along the lower third line for dramatic skies or the upper third line for interesting foregrounds.
Leading Lines
Rivers, roads, shorelines, ridgelines, and other linear elements can guide the viewer's eye through your image toward your main subject. Look for these natural lines and use them to create visual flow in your compositions.
Natural Frames
Overhanging branches, rock formations, or archways can create a frame within your frame, drawing attention to your main subject and adding depth to your composition. These frames also help create a sense of place and scale.
Simplification
Sometimes less is more in landscape photography. Don't try to include every interesting element in a single frame. Instead, identify what captivated you about the scene and compose to emphasize that element, removing distractions from the frame.
Sense of Scale
Including elements of known size (like a person, tree, or building) can help viewers comprehend the true scale of grand landscapes. This technique is particularly effective for conveying the majesty of mountains, canyons, or vast open spaces.
Understanding Light in Landscape Photography
Light is the foundation of all photography, but it's especially critical in landscape work. Different lighting conditions create dramatically different moods and require specific approaches:
Golden Hour
The hour after sunrise and before sunset provides warm, directional light with long shadows that create depth and texture. This light is generally considered ideal for landscape photography. The low angle of the sun creates dramatic side lighting that reveals texture in the landscape and adds dimension to your images.
Blue Hour
The period just before sunrise and after sunset when the sky takes on deep blue tones can create magical atmospheric conditions. This soft, diffused light works well for coastal scenes, cityscapes, and scenes with water that can reflect the blue sky colors.
Midday Light
While often avoided by landscape photographers due to harsh shadows and reduced color saturation, midday light can be effective for:
- Deep canyons where direct light illuminates otherwise dark areas
- Creating high-contrast black and white images
- Photographing waterfalls (with polarizing filters to manage reflections)
Consider converting to black and white when shooting in harsh midday light, as the strong contrast can create dramatic monochrome images.
Overcast Conditions
Cloudy days provide soft, diffused light that's perfect for:
- Forest and woodland photography (eliminating harsh shadows and dappled light)
- Waterfalls and streams (allowing for longer exposures without ND filters)
- Intimate landscapes focusing on patterns, textures, and details
Overcast days also provide more even illumination that can help capture subtle colors and details that might be lost in harsher light.
Dramatic Weather
Some of the most compelling landscape images come from photographing in challenging weather conditions:
- Storms can create dramatic light and atmosphere
- Fog adds mystery and depth
- Fresh snow simplifies landscapes and emphasizes form
- Rain can enhance colors and create reflections
Pro Tip: Weather Planning
Use weather forecasting apps and websites like Clear Outside or PhotoPills to predict conditions for sunrise and sunset. Apps that show cloud cover percentages can help you anticipate dramatic skies.
Technical Considerations for Landscape Photography
Achieving Sharpness Throughout the Frame
One characteristic of compelling landscape images is edge-to-edge sharpness. Several techniques help achieve this:
Finding the Hyperfocal Distance
The hyperfocal distance is the focusing distance that gives you the maximum depth of field from a specific focal length and aperture. By focusing at this distance, everything from half that distance to infinity will appear acceptably sharp. Apps like PhotoPills can calculate this for you, or you can use the following guideline:
- For wide-angle lenses (16-35mm), focus about 1/3 of the way into the scene
- For standard focal lengths, focus on elements in the middle ground
- For telephoto focal lengths, you may need to focus stack (see below)
Aperture Selection
While you might assume that the smallest aperture (highest f-number) gives the most depth of field, diffraction at very small apertures can reduce overall image sharpness. Most lenses perform optimally between f/8 and f/11, which usually provides sufficient depth of field for landscapes while maintaining optimal sharpness.
Focus Stacking
For scenes with very close foreground elements and distant backgrounds, or when using telephoto lenses, a single exposure might not provide sufficient depth of field. Focus stacking involves taking multiple images focused at different distances and blending them in post-processing. Take exposures focusing on:
- The closest foreground elements
- Middle ground elements
- The distant background
Managing Dynamic Range
Landscapes often have extreme brightness differences between sky and foreground. Several techniques can help manage this contrast:
Graduated Neutral Density Filters
These filters are darker at the top and gradually transition to clear at the bottom, allowing you to balance bright skies with darker foregrounds in a single exposure.
Exposure Bracketing and HDR
Take multiple exposures at different settings (typically 3-5 shots from underexposed to overexposed) and blend them in post-processing to capture detail in both highlights and shadows.
Expose for the Highlights
With modern cameras, it's often possible to expose to preserve highlight detail (ensuring the sky isn't blown out) and then recover shadow detail in post-processing. This works particularly well with cameras that have good dynamic range.
Camera Settings for Landscapes
- Shoot in RAW format to maximize your ability to adjust white balance, recover highlights/shadows, and make other adjustments without degrading image quality
- Use base ISO (typically 100 or 200) whenever possible to maximize image quality and dynamic range
- Enable mirror lock-up (for DSLRs) to reduce vibration during exposure
- Use a 2-second self-timer or remote release to eliminate camera shake when pressing the shutter
- Consider using live view for precise focusing, particularly with wide-angle lenses
Planning and Preparation for Landscape Photography
Great landscape photography rarely happens by accident. Planning significantly increases your chances of capturing compelling images:
Location Research
- Study maps and satellite imagery to identify potential vantage points
- Research existing photographs of the area to understand possibilities and find unique perspectives
- Use apps like PhotoPills, The Photographer's Ephemeris, or PlanIt Pro to understand how light will fall on the landscape at different times
- Check access information, parking, and permit requirements
- Allow sufficient travel time to arrive before the best light occurs
Weather and Seasonal Considerations
- Research the best seasons for your chosen location (e.g., autumn colors, wildflower blooms, snow cover)
- Monitor weather forecasts for conditions that could enhance your images (dramatic clouds, fog, or clear skies for night photography)
- Be prepared for rapidly changing conditions, especially in mountainous areas
On-Site Exploration
Once at your location:
- Arrive early to scout different compositions before the best light
- Look beyond obvious viewpoints for unique perspectives
- Consider how the light will change and position yourself accordingly
- Be willing to return multiple times to capture optimal conditions
Post-Processing for Landscape Photography
Most compelling landscape photographs benefit from thoughtful post-processing to realize the photographer's vision. Common adjustments include:
Basic Adjustments
- White balance to capture the mood of the scene
- Exposure adjustments to optimize brightness
- Contrast adjustments to add depth
- Highlights and shadows recovery to manage dynamic range
- Clarity/texture to enhance detail
- Vibrance/saturation to optimize color (be careful not to over-saturate)
Local Adjustments
- Graduated filters to balance sky and foreground exposure
- Radial filters to direct attention to the main subject
- Adjustment brushes for targeted adjustments to specific areas
Advanced Techniques
- HDR merging to combine bracketed exposures
- Focus stacking to achieve front-to-back sharpness
- Panorama stitching for high-resolution wide views
- Luminosity masking for precise control of different brightness levels
- Color grading to create a cohesive look across your landscape portfolio
Pro Tip: Develop Your Personal Style
While technical excellence is important, the most memorable landscape photographers develop a distinctive style. This might involve particular compositions, lighting conditions, subject matter, or post-processing approaches that make your work recognizably yours.
Landscape photography offers a rewarding combination of technical challenge, artistic expression, and connection with the natural world. By mastering the fundamentals outlined in this guide and developing your unique vision, you'll create landscape images that not only document beautiful places but also express your personal relationship with the natural environment.

David Chen
May 6, 2024This is such a comprehensive guide! I've been struggling with getting sharp images from foreground to background in my landscape shots. Going to try focus stacking on my next outing. Thanks for sharing these techniques!
Laura Wilson
May 7, 2024What are your thoughts on using smartphones for landscape photography? I've seen some impressive shots taken with the latest phones, but I wonder if a dedicated camera is still necessary for serious landscape work.
Michael Turner
May 8, 2024Great question, Laura! Modern smartphones can absolutely produce stunning landscape images, especially in good light. They've gotten remarkably good at computational photography, which helps overcome their smaller sensors. Where dedicated cameras still have advantages are in dynamic range, low light performance, lens options (especially wide-angle and telephoto), and greater creative control. But the best camera is always the one you have with you, and a well-composed smartphone image will beat a poorly executed DSLR shot any day. If you're just starting out, master composition with your phone before investing in more gear!
Thomas Reid
May 8, 2024Do you have any recommendations for landscape photography locations in the UK? I'm planning a photography trip this summer and would love some suggestions for less well-known spots with great potential.